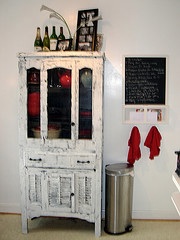
If you have chosen to decorate your home in shabby chic, french country, rustic or just plain ole country, you will find that distressed wood is often featured in these styles.
You can find good quality pieces of wood furniture at auctions and such, but sometimes they need a little more aging. That's when the process below comes in handy.
The process is actually quite easy and will work when re-doing your existing cabinets, any real wood or fake wood pieces or whether you have bought a piece of wood furniture that you want to give the weathered look.
Let your kids help with this project.. Yeah I know you are probably thinking they could have a brand new piece of furniture beat and banged up in no time flat, but it's just not the same as when you use this process.
Although this article refers to cabinets it works the same way on any wood piece

Wood Working Tools:
- Primer
- Paint - 2 colors
- Roller paint brushes
- A variety of 2", 3", or 4" paint brushes
- Glaze
- Wood Stain
- Sandpaper
- Drop cloths
- Hammer
- Nails
Wood Working Instructions
Remember to remove all cabinet hardware before beginning this process.
If you want your cabinets or other furniture to have scratches, dings and dents, you will first want to beat it up...Literally. Beat it with the hammer to knock a few dents in it, hammer in some nail holes, use the nails to scratch the wood. This step is completely up to you!!
Now to begin the process, first you need to sand the surface of your plain cabinets. Once you have the surface lightly sanded, wipe off the dust with a clean dry cloth.
Next, you will apply a coat of primer. If you are using a cheap fake wood this step is very important. If you don't sand and then prime the surface, your paint will not stick.
If you want a rough more rustic surface try applying the primer with one of the 4" brushes, but if you prefer a smoother look you can roll the paint on with the roller paint brushes.
It's very important to allow your primer plenty time to completely dry.
When your primer is completely dry, apply a coat of base paint. The base paint color should not be the actual color you want your cabinets to be, but the color you want showing through when you finish the cabinets.
Now you are ready to paint your surface with the real color you wish it to be.
Don't be scared to choose a bright color because the weathering technique will tone down the color.
Once this coat of paint has completely dried you are ready to start giving it the weathered look. You simply use sand paper to rough up edges and other areas that you would expect to age and weather over time.
When you have finished sanding the cabinet, to your desired effect, gently wipe down the cabinet surface with a clean dry cloth.
That's all there is to it, but if you want to age your cabinets even more, you can mix 1/2 glaze and 1/2 wood stain, then apply this mixture using a clean white rag. This will darken your cabinets and give them a more aged look.
You can do this process until you achieve the level of distressed wood you want for your cabinets.
